Configuring the Switch Ports
This chapter provides information about changing port configuration settings. It includes command-line interface (CLI) procedures for using commands that have been specifically created or changed for the Catalyst 2950 switches. For complete syntax and usage information for the commands used in this chapter, refer to the Catalyst 2950 Desktop Switch Command Reference.

Note  Certain port features can conflict with one another. Review the "Avoiding Configuration Conflicts" section before you change the port settings.
This chapter does not repeat the concepts and CLI procedures provided in the standard Cisco IOS Release 12.1 documentation. For information about the standard IOS Release 12.1 commands, refer to the IOS documentation set available from the Cisco.com home page at Service and Support > Technical Documents. On the Cisco Product Documentation home page, select Release 12.1 from the Cisco IOS Software drop-down list.
For information about configuring these settings from Cluster Management Suite (CMS), refer to the online help.
Note Some features can be implemented only by using the CLI.
Changing the Port Speed and Duplex Mode

Caution If you reconfigure the port through which you are managing the switch, a Spanning Tree Protocol (STP) reconfiguration could cause a temporary loss of connectivity.
Follow these guidelines when configuring the duplex and speed settings:
•Gigabit Ethernet ports should always be set to 1000 Mbps but can negotiate full duplex with the attached device.
•Gigabit Ethernet ports that do not match the settings of an attached device lose connectivity and do not generate statistics.
•GigaStack-to-GigaStack stack connections operate in half-duplex mode, and GigaStack-to-GigaStack point-to-point connections operate in full-duplex mode.
•If STP is enabled, the switch can take up to 30 seconds to check for loops when a port is reconfigured. The port LED is amber while STP reconfigures.
Connecting to Devices That Do Not Autonegotiate
To connect to a remote 100BASE-T device that does not autonegotiate, set the duplex setting to Full or Half, and set the speed setting to Auto. Autonegotiation for the speed setting selects the correct speed even if the attached device does not autonegotiate, but the duplex setting must be explicitly set.
To connect to a remote Gigabit Ethernet device that does not autonegotiate, disable autonegotiation on the local device, and set the duplex and flow control parameters to be compatible with the other device.
Setting Speed and Duplex Parameters
Beginning in privileged EXEC mode, follow these steps to set the speed and duplex parameters on a port:
Configuring IEEE 802.3X Flow Control
Flow control enables connected Ethernet ports to control traffic rates during congestion by allowing congested nodes to pause link operation at the other end. If one port experiences congestion and cannot receive any more traffic, it notifies the other port to stop sending until the condition clears. When the local device detects any congestion at its end, it can notify the link partner or the remote device by sending a pause frame. Upon receipt of a pause frame, the remote device stops sending any data packets, which prevents any loss of data packets during the congestion period.
Note We strongly recommend that you do not configure IEEE 802.3X flowcontrol when quality of service (QoS) is configured on the switch. Before configuring flowcontrol on an interface, make sure to disable QoS on the switch.
Flow control can be implemented in two forms, symmetric and asymmetric. The symmetric implementation is suitable for point-to-point links, and asymmetric is suitable for hub-to-end node connections, where it is desirable for the hub to pause the end system, but not vice-versa. You use the flowcontrol interface configuration command to set the interface's ability to receive and send pause frames to on, off, or desired. The default state for 10/100/1000 Mbps ports isreceive off and send desired.
These rules apply to flow control settings on the device:
•receive on (or desired) and send on: Flow control operates in both directions; both the local and the remote devices can send pause frames to show link congestion.
•receive on (or desired) and send desired: The port can receive pause frames and can send pause frames if the attached device supports flow control.
•receive on (or desired) and send off: The port cannot send pause frames but can operate with an attached device that is required to or can send pause frames; the port can receive pause frames.
•receive off and send on: The port sends pause frames if the remote device supports flow control but cannot receive pause frames from the remote device.
•receive off and send desired: The port cannot receive pause frames but can send pause frames if the attached device supports flow control.
•receive off and send off: Flow control does not operate in either direction. In case of congestion, no indication is given to the link partner, and no pause frames are sent or received by either device.
Note For details on the command settings and the resulting flow control resolution on local and remote ports, refer to the flowcontrol interface configuration command in the Catalyst 2950 Desktop Switch Command Reference for this release.
Beginning in privileged EXEC mode, follow these steps to configure flow control on an interface:
To disable flow control, use the flowcontrol receive off and flowcontrol send off interface configuration commands.
Configuring Flooding Controls
You can use these flooding techniques to block the forwarding of unnecessary flooded traffic.
Enabling Storm Control
A packet storm occurs when a large number of broadcast, unicast, or multicast packets are received on a port. Forwarding these packets can cause the network to slow down or to time out. Storm control is configured for the switch as a whole but operates on a per-port basis. By default, storm control is disabled.
Storm control uses rising and falling thresholds to block and then restore the forwarding of broadcast, unicast, or multicast packets. You can also set the switch to shut down the port when the rising threshold is reached.
Storm control uses a bandwidth-based method to measure traffic activity. The thresholds are expressed as a percentage of the total available bandwidth that can be used by the broadcast, multicast, or unicast traffic.
The rising threshold is the percentage of total available bandwidth associated with multicast, broadcast, or unicast traffic before forwarding is blocked. The falling threshold is the percentage of total available bandwidth below which the switch resumes normal forwarding. In general, the higher the level, the less effective the protection against broadcast storms.
Beginning in privileged EXEC mode, follow these steps to enable storm control:
Disabling Storm Control
Beginning in privileged EXEC mode, follow these steps to disable storm control:
Configuring Protected Ports
Some applications require that no traffic be forwarded by the Layer 2 protocol between ports on the same switch. In such an environment, there is no exchange of unicast, broadcast, or multicast traffic between ports on the switch, and traffic between ports on the same switch is forwarded through a Layer 3 device such as a router.
To meet this requirement, you can configure Catalyst 2950 ports as protected ports (also referred to as private VLAN edge ports). Protected ports do not forward any traffic to protected ports on the same switch. This means that all traffic passing between protected ports—unicast, broadcast, and multicast—must be forwarded through a Layer 3 device. Protected ports can forward any type of traffic to nonprotected ports, and they forward as usual to all ports on other switches. Dynamically learnt addresses are not retained if the switch is reloaded.
Note When both SPAN source and SPAN destination ports are protected ports, traffic is forwarded from the SPAN source to the SPAN destination. Therefore, do not configure both SPAN source and SPAN destination as protected ports.
Beginning in privileged EXEC mode, follow these steps to define a port as a protected port:
Use the no version of the switchport protected interface configuration command to disable the protected port option.
Enabling Port Security
Secured ports restrict a port to a user-defined group of stations. When you assign secure addresses to a secure port, the switch does not forward any packets with source addresses outside the defined group of addresses. If you define the address table of a secure port to contain only one address, the workstation or server attached to that port is guaranteed the full bandwidth of the port. As part of securing the port, you can also define the size of the address table for the port.
Note Port security can only be configured on static access ports.
Secured ports generate address-security violations under these conditions:
•The address table of a secured port is full, and the address of an incoming packet is not found in the table.
•An incoming packet has a source address assigned as a secure address on another port.
Limiting the number of devices that can connect to a secure port has these advantages:
•Dedicated bandwidth—If the size of the address table is set to 1, the attached device is guaranteed the full bandwidth of the port.
•Added security—Unknown devices cannot connect to the port.
These options validate port security or show security violations:
For the restrictions that apply to secure ports, see the "Avoiding Configuration Conflicts" section.
Defining the Maximum Secure Address Count
A secure port can have from 1 to 132 associated secure addresses. Setting one address in the MAC address table for the port ensures that the attached device has the full bandwidth of the port.
If the secure-port maximum addresses are set between 1 to 132 addresses and some of the secure addresses have not been added by user, the remaining addresses are dynamically learnt and become secure addresses.
Note If the port link goes down, all the dynamically learned addresses are removed.
Enabling Port Security
Beginning in privileged EXEC mode, follow these steps to enable port security:
Disabling Port Security
Beginning in privileged EXEC mode, follow these steps to disable port security:
Understanding the EtherChannel
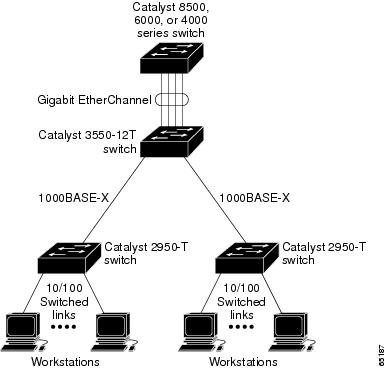
The EtherChannel is composed of individual Fast Ethernet or Gigabit Ethernet links bundled into a single logical link as shown in Figure 10-1. The EtherChannel provides full-duplex bandwidth up to 800 Mbps (Fast EtherChannel) or 2 Gbps (Gigabit EtherChannel) between your switch and another switch or host.
Each EtherChannel can consist of up to eight compatibly configured Ethernet interfaces. All interfaces in each EtherChannel must be the same speed, and all must be configured as Layer 2 interfaces.
Note The network device to which your switch is connected can impose its own limits on the number of interfaces in the EtherChannel. For Catalyst 2950 switches, the number of EtherChannels is limited to six with eight ports per EtherChannel.
If a link within an EtherChannel fails, traffic previously carried over that failed link changes to the remaining links within the EtherChannel. A trap is sent for a failure, identifying the switch, the EtherChannel, and the failed link. Inbound broadcast and multicast packets on one link in an EtherChannel are blocked from returning on any other link of the EtherChannel.
Figure 10-1 Typical EtherChannel Configuration
Understanding Port-Channel Interfaces
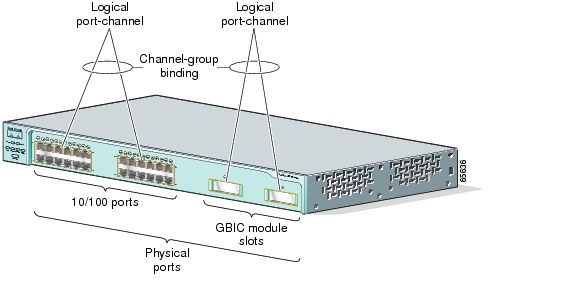
When you create an EtherChannel for Layer 2 interfaces, a logical interface is dynamically created. You then manually assign an interface to the EtherChannel by using the channel-group interface configuration command as shown in Figure 10-2.
Each EtherChannel has a logical port-channel interface numbered from 1 to 6.
Figure 10-2 Relationship of Physical Ports, Logical Port Channels, and Channel Groups
After you configure an EtherChannel, configuration changes applied to the port-channel interface apply to all the physical interfaces assigned to the port-channel interface. Configuration changes applied to the physical interface affect only the interface where you apply the configuration. To change the parameters of all ports in an EtherChannel, apply configuration commands to the port-channel interface, for example, Spanning Tree Protocol (STP) commands or commands to configure a Layer 2 EtherChannel as a trunk.
Understanding the Port Aggregation Protocol
The Port Aggregation Protocol (PAgP) facilitates the automatic creation of EtherChannels by exchanging packets between Ethernet interfaces. By using PAgP, the switch learns the identity of partners capable of supporting PAgP and learns the capabilities of each interface. It then dynamically groups similarly configured interfaces into a single logical link (channel or aggregate port); these interfaces are grouped based on hardware, administrative, and port parameter constraints. For example, PAgP groups the interfaces with the same speed, duplex mode, native VLAN, VLAN range, and trunking status and type. After grouping the links into an EtherChannel, PAgP adds the group to the spanning tree as a single switch port.
PAgP Modes
Table 10-1 shows the user-configurable EtherChannel modes for the channel-group interface configuration command: on, auto, and desirable. Switch interfaces exchange PAgP packets only with partner interfaces configured in the auto or desirable modes; interfaces configured in the on mode do not exchange PAgP packets.
Both the auto and desirable modes allow interfaces to negotiate with partner interfaces to determine if they can form an EtherChannel based on criteria such as interface speed and, for Layer 2 EtherChannels, trunking state and VLAN numbers.
Interfaces can form an EtherChannel when they are in different PAgP modes as long as the modes are compatible. For example:
•An interface in desirable mode can form an EtherChannel with another interface that is in desirable or auto mode.
•An interface in auto mode can form an EtherChannel with another interface in desirable mode.
•An interface in auto mode cannot form an EtherChannel with another interface that is also in auto mode because neither interface initiates PAgP negotiation.
An interface in the on mode that is added to a port channel is forced to have the same characteristics as the already existing on mode interfaces in the channel.
Caution You should exercise care when setting the mode to on (manual configuration). All ports configured in the on mode are bundled in the same group and are forced to have similar characteristics. If the group is misconfigured, packet loss or STP loops might occur.
If your switch is connected to a partner that is PAgP-capable, you can configure the switch interface for nonsilent operation by using the non-silent keyword. If you do not specify non-silent with the auto or desirable mode, silent mode is assumed.
The silent mode is used when the switch is connected to a device that is not PAgP-capable and seldom, if ever, transmits packets. An example of a silent partner is a file server or a packet analyzer that is not generating traffic. In this case, running PAgP on a physical port connected to a silent partner prevents that switch port from ever becoming operational; however, the silent setting allows PAgP to operate, to attach the interface to a channel group, and to use the interface for transmission.
Physical Learners and Aggregate-Port Learners
Network devices are classified as PAgP physical learners or aggregate-port learners. A device is a physical learner if it learns addresses by physical ports and directs transmissions based on that learning. A device is an aggregate-port learner if it learns addresses by aggregate (logical) ports.
When a device and its partner are both aggregate-port learners, they learn the address on the logical port-channel. The device transmits packets to the source by using any of the interfaces in the EtherChannel. With aggregate-port learning, it is not important on which physical port the packet arrives.
The Catalyst 2950 switch uses source-MAC address distribution for a channel if it is connected to a physical learner even if the user configures destination-MAC address distribution.
These frame distribution mechanisms are possible for frame transmission:
•Port selection based on the source-MAC address of the packet
•Port selection based on the destination- MAC address of the packet
Catalyst 2950 switches support a maximum of eight ports to a PAgP group.
PAgP Interaction with Other Features
The Dynamic Trunking Protocol (DTP) and Cisco Discovery Protocol (CDP) send and receive packets over the physical interfaces in the EtherChannel. Trunk ports send and receive PAgP protocol data units (PDUs) on the lowest numbered VLAN.
STP sends packets over a single physical interface in the EtherChannel. Spanning tree regards the EtherChannel as one port.
PAgP sends and receives PAgP PDUs only from interfaces that are up and have PAgP enabled for auto or desirable modes.
Understanding Load Balancing and Forwarding Methods
EtherChannel balances the traffic load across the links in a channel by reducing part of the binary pattern formed from the addresses in the frame to a numerical value that selects one of the links in the channel. EtherChannel load balancing can use either source-MAC or destination-MAC address forwarding.
With source-MAC address forwarding, when packets are forwarded to an EtherChannel, they are distributed across the ports in the channel based on the source-MAC address of the incoming packet. Therefore, to provide load balancing, packets from different hosts use different ports in the channel, but packets from the same host use the same port in the channel (and the MAC address learned by the switch does not change).
With destination-MAC address forwarding, when packets are forwarded to an EtherChannel, they are distributed across the ports in the channel based on the destination host's MAC address of the incoming packet. Therefore, packets to the same destination are forwarded over the same port, and packets to a different destination are sent on a different port in the channel. You configure the load balancing and forwarding method by using the port-channel load-balance global configuration command.
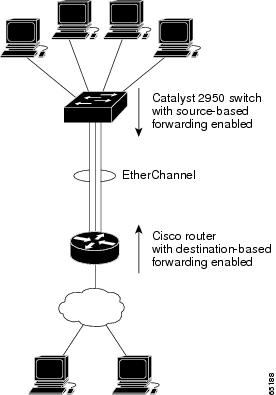
In Figure 10-3, an EtherChannel of four workstations communicates with a router. Because the router is a single-MAC-address device, source-based forwarding on the switch EtherChannel ensures that the switch uses all available bandwidth to the router. The router is configured for destination-based forwarding because the large number of workstations ensures that the traffic is evenly distributed from the router EtherChannel.
Use the option that provides the greatest variety in your configuration. For example, if the traffic on a channel is going only to a single MAC address, using the destination-MAC address always chooses the same link in the channel; using source addresses might result in better load balancing.
Figure 10-3 Load Distribution and Forwarding Methods
Default EtherChannel Configuration
Table 10-2 shows the default EtherChannel configuration.
EtherChannel Configuration Guidelines
If improperly configured, some EtherChannel interfaces are automatically disabled to avoid network loops and other problems. Follow these guidelines to avoid configuration problems:
•Each EtherChannel can have up to eight compatibly configured Ethernet interfaces.
•Configure all interfaces in an EtherChannel to operate at the same speeds and duplex modes.
•Enable all interfaces in an EtherChannel. If you shut down an interface in an EtherChannel, it is treated as a link failure, and its traffic is transferred to one of the remaining interfaces in the EtherChannel.
•When a group is first created, all ports follow the parameters set for the first port to be added to the group. If you change the configuration of one of these parameters, you must also make the changes to all ports in the group:
–Allowed-VLAN list
–STP path cost for each VLAN
–STP port priority for each VLAN
–STP Port Fast setting
•If you configure SPAN on a port that is a member of the EtherChannel, it leaves the EtherChannel.
•For EtherChannels:
–Assign all interfaces in the EtherChannel to the same VLAN, or configure them as trunks.
–If you configure an EtherChannel from trunk interfaces, verify that the trunking mode (802.1Q) is the same on all the trunks. Inconsistent trunk modes on EtherChannel interfaces can have unexpected results.
–An EtherChannel supports the same allowed range of VLANs on all the interfaces in a trunking Layer 2 EtherChannel. If the allowed range of VLANs is not the same, the interfaces do not form an EtherChannel even when PAgP is set to the auto or desirable mode.
–Interfaces with different STP path costs can form an EtherChannel as long they are otherwise compatibly configured. Setting different STP path costs does not, by itself, make interfaces incompatible for the formation of an EtherChannel.
Configuring EtherChannels
You configure Layer 2 EtherChannels by configuring the Ethernet interfaces with the channel-group interface configuration command, which creates the port-channel logical interface.
Note Layer 2 interfaces must be connected and functioning for IOS to create port-channel interfaces.
Beginning in privileged EXEC mode, follow these steps to assign a Layer 2 Ethernet interface to a Layer 2 EtherChannel:
If you delete the EtherChannel is by using the no interface port-channel global configuration command without removing the physical interfaces, the physical interfaces are shutdown. If you do not want the member physical interfaces to shut down, remove the physical interfaces before deleting the EtherChannel.
To remove an interface from the EtherChannel group, use the no channel-group interface configuration command.
This example shows how to assign Gigabit Ethernet interfaces 0/1 and 0/2 with PAgP mode desirable:
Switch# configure terminal
Switch(config)# interface range gigabitethernet0/1 -2
Switch(config-if)# channel-group 5 mode desirable
Switch(config-if)# end
Configuring EtherChannel Load Balancing
This section describes how to configure EtherChannel load balancing by using source-based or destination-based forwarding methods. For more information, see the "Understanding Load Balancing and Forwarding Methods" section.
Beginning in privileged EXEC mode, follow these steps to configure EtherChannel load balancing:
To return EtherChannel load balancing to the default configuration, use the no port-channel load-balance global configuration command.
Configuring the PAgP Learn Method and Priority
Network devices are classified as PAgP physical learners or aggregate-port learners. A device is a physical learner if it learns addresses by physical ports and directs transmissions based on that knowledge. A device is an aggregate-port learner if it learns addresses by aggregate ports.
For compatibility with Catalyst 1900 series switches, configure the Catalyst 2950 switches for souce-MAC load distribution.
The Catalyst 2950 supports address learning only on aggregate ports even though the physical-port keyword is provided in the command-line interface (CLI). The pagp learn-method and the pagp port-priority interface configuration command have no effect on the switch hardware.
Note You should not set the learn method to physical-port because the switch is an aggregate-learning device.
If the link partner to the switch is a physical learner that has the channel-group interface configuration command set to auto or desirable, the switch automatically uses the load-distribution method based on the source MAC address, regardless of the configured load distribution method.
If the link partner to the Catalyst 2950 switch is a physical learner that has the channel-group interface configuration command set to on, set the load-distribution method based on the source MAC address by using the port-channel load-balance src-mac global configuration command.
Displaying EtherChannel and PAgP Status
You can use the user EXEC commands described in Table 10-3 to display EtherChannel and PAgP status information:
Command
|
Description
|
|---|---|
show etherchannel [channel-group-number] {brief | detail | load-balance | port | port-channel | summary}
|
Displays EtherChannel information in a brief, detailed, and one-line summary form. Also displays the load-balance or frame-distribution scheme, port, and port-channel information.
|
show pagp {channel-group-number} {counters | internal | neighbor}1
|
Displays PAgP information such as traffic information, the internal PAgP configuration, and neighbor information.
|
1 You can clear PAgP channel-group information and traffic filters by using the clear pagp {channel-group-number | counters} privileged EXEC command.
|
For detailed information about the fields in the displays, refer to the Catalyst 2950 Desktop Switch Command Reference for this release.
Configuring UniDirectional Link Detection
UniDirectional Link Detection (UDLD) is a Layer 2 protocol that detects and shuts down unidirectional links. You can configure UDLD on the entire switch or on an individual port. Use the udld reset command to reset all ports that have been shut down by UDLD.
Beginning in privileged EXEC mode, follow these steps to configure UDLD on a switch:
Understanding SPAN
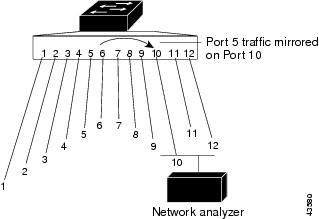
You can analyze network traffic passing through ports or VLANs by using SPAN to send a copy of the traffic to another port on the switch that has been connected to a SwitchProbe device or other Remote Monitoring (RMON) probe. SPAN mirrors received or sent (or both) traffic on one or more source ports to a destination port for analysis.
For example, in Figure 10-4, all traffic on FastEthernet port 5 (the source port) is mirrored to FastEthernet port 10 (the destination port). A network analyzer on port 10 receives all network traffic from port 5 without being physically attached to port 5.
Figure 10-4 Example SPAN Configuration
Only traffic that enters or leaves source ports can be monitored by using SPAN.
This release supports only local SPAN, which means the source and destination interfaces must be on the same switch.
SPAN does not affect the switching of network traffic on source ports; a copy of the packets received or sent by the source interfaces are sent to the destination interface. However, an oversubscribed SPAN destination, for example, a 10-Mbps port monitoring a 100-Mbps port, can cause congestion on the switch. Destination ports do not receive or forward traffic, except that required for the SPAN session.
SPAN Concepts and Terminology
This section describes concepts and terminology associated with SPAN configuration.
SPAN Session
A SPAN session is an association of a destination port with source ports. You can monitor incoming or outgoing traffic on a series or range of ports.
SPAN sessions do not interfere with the normal operation of the switch.
You can configure SPAN sessions on disabled ports; however, a SPAN session does not become active unless you enable the destination port and at least one source port. The show monitor session session_number privileged EXEC command displays the operational status of a SPAN session.
A SPAN session remains inactive after system power-on until the destination port is operational.
Traffic Types
SPAN sessions include these traffic types:
•Receive (Rx) SPAN—The goal of receive (or ingress) SPAN is to monitor as much as possible all the packets received by the source interface. A copy of each packet received by the source is sent to the destination port for that SPAN session. You can monitor a series or range of ingress ports in a SPAN session.
At the destination port, the packets are seen with the 802.1Q tag, but packets from the switch CPU to the destination port are without the 802.1Q tag.
Packets that are modified because of quality of service (QoS)—for example, modified Differentiated Services Code Point (DSCP)—are copied with modification for Rx SPAN.
Some features that can cause a packet to be dropped during receive processing have no effect on SPAN; the destination port receives a copy of the packet even if the actual incoming packet is dropped. These features include IP standard and extended input access control lists (ACLs), IP standard and extended output ACLs for unicast and ingress QoS policing. Switch congestion that causes packets to be dropped also has no effect on SPAN.
•Transmit (Tx) SPAN—The goal of transmit (or egress) SPAN is to monitor as much as possible all the packets sent by the source interface after all modification and processing is performed by the switch. A copy of each packet sent by the source is sent to the destination port for that SPAN session. The copy is provided after the packet is modified. You can monitor a range of egress ports in a SPAN session.
On packets that are modified because of QoS, the modified packet might not have the same DSCP (IP packet) or CoS (non-IP packet) as the SPAN source.
Some features that can cause a packet to be dropped during transmit processing might also affect the duplicated copy for SPAN. These features include IP standard and extended output ACLs on multicast packets and egress QoS policing. In the case of output ACLs, if the SPAN source drops the packet, the SPAN destination would also drop the packet. If the source port is oversubscribed, the destination ports will have different dropping behavior.
•Both—In a SPAN session, a series or range of ports can be monitored for both received and sent packets.
Source Port
A source port (also called a monitored port) is a switched port that you monitor for network traffic analysis. In a single SPAN session, you can monitor source port traffic such as received (Rx), transmitted (Tx), or bidirectional (both). The switch supports any number of source ports (up to the maximum number of available ports on the switch).
A source port has these characteristics:
•It can be any port type (for example, EtherChannel, Fast Ethernet, Gigabit Ethernet, and so forth).
•It cannot be a destination port.
•Each source port can be configured with a direction (ingress, egress, or both) to monitor. For EtherChannel sources, the monitored direction would apply to all the physical ports in the group.
•Source ports can be in the same or different VLANs.
You can configure a trunk port as a source port. All VLANs active on the trunk are monitored on a trunk source port.
Destination Port
A SPAN session must have a destination port (also called a monitoring port) that receives a copy of traffic from the source port.
The destination port has these characteristics:
•It must reside on the same switch as the source port.
•It can be any Ethernet physical port.
•It cannot be a source port.
•It cannot be an EtherChannel port.
•When it is active, incoming traffic is disabled; it does not forward any traffic except that required for the SPAN session.
•It does not participate in spanning tree while the SPAN session is active.
•When it is an active destination port, it does not participate in any of the Layer 2 protocols (STP, VTP, CDP, DTP, PagP).
•No address learning occurs on the destination port.
SPAN Traffic
You can use SPAN to monitor all network traffic, including multicast and bridge protocol data unit (BPDU) packets, and CDP, VTP, DTP, STP, and PagP packets.
In some SPAN configurations, multiple copies of the same source packet are sent to the SPAN destination port. For example, a bidirectional (both Rx and Tx) SPAN session is configured for sources a1 and a2 to a destination port d1. If a packet enters the switch through a1 and is switched to a2, both incoming and outgoing packets are sent to destination port d1. Both packets are the same.
SPAN Interaction with Other Features
SPAN interacts with these features:
•Spanning Tree Protocol (STP)—A destination port does not participate in STP while its SPAN session is active. The destination port can participate in STP after the SPAN session is disabled. On a source port, SPAN does not affect the STP status.
Caution Make sure there are no potential loops in the network topology when you enable incoming traffic for a destination port.
•Cisco Discovery Protocol (CDP)—A SPAN destination port does not participate in CDP while the SPAN session is active. After the SPAN session is disabled, the port again participates in CDP.
•VLAN and trunking—You can modify VLAN membership or trunk settings for source and destination ports at any time. However, changes in VLAN membership or trunk settings for a destination port do not take effect until you disable the SPAN session. Changes in VLAN membership or trunk settings for a source port immediately take effect, and the SPAN sessions automatically adjust accordingly.
•EtherChannel—You can configure an EtherChannel group as a source port but not as a SPAN destination port. SPAN configuration fails if the destination port is part of an EtherChannel group. When a channel group is configured as a SPAN source, the entire group is monitored.
If a port is added to a monitored EtherChannel group, the new port is added to the SPAN source port list. If a port is removed from a monitored EtherChannel group, it is automatically removed from the source port list. If the port is the only port in the EtherChannel group, the EtherChannel group is removed from SPAN.
If a physical port that belongs to an EtherChannel group is configured as a SPAN source or destination port, it is removed from the EtherChannel group. After the port is removed from the SPAN session, it rejoins the EtherChannel group.
•QoS—For ingress monitoring, the packets sent to the SPAN destination port might be different from the packets actually received at the SPAN source port because the packets are forwarded after ingress QoS classification and policing. The packet DSCP might not be the same as the received packet.
•Multicast traffic can be monitored. For egress and ingress port monitoring, only a single unedited packet is sent to the SPAN destination port. It does not reflect the number of times the multicast packet is sent.
Configuring SPAN
This section describes how to configure SPAN on your switch and contains this information:
•SPAN Configuration Guidelines
•Creating a SPAN Session and Specifying Ports to Monitor
•Removing Ports from a SPAN Session
•Displaying SPAN Status
SPAN Configuration Guidelines
Follow these guidelines when configuring SPAN:
•SPAN is disabled by default.
•Use a network analyzer to monitor ports.
•Only one SPAN sessions can be active on a switch at the same time.
•The destination port cannot be a source port; a source port cannot be a destination port.
•You can have only one destination port.
•An EtherChannel port can be a SPAN source port; it cannot be a SPAN destination port.
•For a SPAN source port, you can monitor transmitted and received traffic for a single port or for a series or range of ports.
•When you configure a switch port as a SPAN destination port, it is no longer a normal switch port; only monitored traffic passes through the SPAN destination port.
•When you specify a single source port and do not specify a traffic type (Tx, Rx, or both), both is the default.
•You can configure a disabled port to be a source or destination port, but the SPAN function does not start until the destination port and at least one source port is enabled.
•The no monitor session session_number global configuration command removes a source or destination port from the SPAN session from the SPAN session. If you do not specify any options following the no monitor session session_number command, the entire SPAN session is removed.
•A SPAN destination port never participates in any VLAN spanning tree. SPAN does include BPDUs in the monitored traffic, so any spanning-tree BPDUs received on the SPAN destination port for a SPAN session were copied from the SPAN source ports.
•When SPAN is enabled, configuration changes have these results:
–If you change the VLAN configuration of a destination port, the change is not effective until SPAN is disabled.
–If you disable all source ports or the destination port, the SPAN function stops until both a source and destination port are enabled.
Creating a SPAN Session and Specifying Ports to Monitor
Beginning in privileged EXEC mode, follow these steps to create a SPAN session and specify the source (monitored) and destination (monitoring) ports:
To remove the entire SPAN session, use the no monitor session session_number global configuration command. To remove a source or destination port from the SPAN session, use the no monitor session session_number source interface interface-id global configuration command or the no monitor session session_number destination interface interface-id global configuration command.
This example shows how to set up a SPAN session, session 1, for monitoring source port traffic to a destination port. First, any existing SPAN configuration for session 1 is cleared, and then bidirectional traffic is mirrored from source port 1 to destination port 2.
Switch(config)# no monitor session 1
Switch(config)# monitor session 1 source interface gigabitethernet0/1
Switch(config)# monitor session 1 destination interface gigabitethernet0/2
Switch(config)# end
Switch# show monitor session 1
Session 1
---------
Source Ports:
RX Only: None
TX Only: None
Both: Gi0/1
Destination Ports: Gi0/2
Use the show monitor session privileged EXEC command to verify the configuration.
Removing Ports from a SPAN Session
Beginning in privileged EXEC mode, follow these steps to remove a port as a SPAN source for a session:
To remove a destination port from the SPAN session, use the no monitor session session_number destination interface interface-id global configuration command.
This example shows how to remove port 1 as a SPAN source for SPAN session 1 and to verify the configuration:
Switch(config)# no monitor session 1 source interface gigabitethernet0/1
Switch(config)# end
Switch# show monitor session 1
Session 1
---------
Source Ports:
RX Only: None
TX Only: None
Both: None
Destination Ports:Gi0/2
This example shows how to disable received traffic monitoring on port 1, which was configured for bidirectional monitoring:
Switch(config)# no monitor session 1 source interface gigabitethernet0/1 rx
The monitoring of traffic received on port 1 is disabled, but traffic sent from this port continues to be monitored.
Displaying SPAN Status
To display the status of the current SPAN configuration, use the show monitor privileged EXEC command.
This is an example of output for the show monitor privileged EXEC command for session 1:
Switch# show monitor session 1
Session 2
---------
Source Ports:
RX Only: Gi0/1
TX Only: None
Both: None
Destination Ports:Gi0/2

No comments:
Post a Comment